
Taking Control of Your Docker Image
In this tutorial, you’ll learn:
- How to reverse engineer what’s in a Public Docker Image
- How to create your own version of an image to minimize dependencies (and know what’s in your images)
- Things to consider rolling your own Docker images
In the previous post I walked through creating a full set of Docker images to deploy Jenkins in containers. The value my team has gained from this work is the ability to quickly spin up Jenkins test environments. These environments can be used to test plugins in isolation or create reproduction cases for problems we’re encountering. For example, containers make it easier to test the impact of a Jenkins upgrade on a particular configuration. I can persist the data with a data volume and upgrade my Jenkins master image without fear.
These examples are also one of the primary ways I taught myself more complicated Docker options. How would Docker work in a real world scenario? How do I solve for persistence? I had a lot of trouble finding good documentation. I used the work discussed in these posts as a foundation to explore other possibilities, such as using Docker containers as build slaves. This agility allows my team to develop tools that give Riot engineers the freedom to own their build pipelines and build environments.
Back when I started this adventure several years ago, there also wasn’t a very good Cloudbees Jenkins image like there is today. I was hand-creating my jenkins-master image based on how I deployed Jenkins on our production servers. Which leads me to this post: it’s time to break down the Cloudbees image to really understand how it works.
Managing your dependencies is somewhat subjective. For myself, working at Riot, I like to minimize my reliance on public dependencies. In Docker terms this is all about knowing where the FROM clause in the Dockerfile points and what it’s retrieving. If you want to know where your images come from and what’s in them, this post will be very relevant to your interests. Likewise if you want to change the default OS, version of Java in use, or remove some of the fancier features of the Cloudbees container. If you’re happy with the “it just works” aspects of what’s been done so far, this post may be less relevant.
Controlling your own image does have these benefits:
- Control of the default OS layer of the image. If a Dockerfile relies on a chain of FROM clauses, whichever one was first controls the OS. So knowing everything that goes into the image being used is necessary to change it.
- Every image used in the inheritance chain may come from a public source and could potentially be changed without warning and may contain something unwanted. There is of course a security risk but to me it’s also just about not allowing things to change without warning.
DISCOVERING DEPENDENCIES
The first step is paying attention to what is in the dependency list for the Dockerfile we have. So far, I’ve used the public Jenkins CI Dockerfile for all of the tutorials. So let’s start there and see what it uses.
We first need to find the Dockerfile that defines the image we’re using. Dockerhub makes this fairly painless and we’ll be using Dockerhub to lead us to all the Dockerfiles of the images we seek, starting with the Jenkins image. To figure out which image we’re using, all that’s needed is to take a look at the jenkins-master Dockerfile we previously created.
FROM jenkins/jenkins:2.112
LABEL maintainer=”[email protected]”

# Prep Jenkins Directories
USER root
RUN mkdir /var/log/jenkins
RUN mkdir /var/cache/jenkins
RUN chown -R jenkins:jenkins /var/log/jenkins
RUN chown -R jenkins:jenkins /var/cache/jenkins
USER jenkins


# Set Defaults
ENV JAVA_OPTS="-Xmx8192m"
ENV JENKINS_OPTS="--handlerCountMax=300 --logfile=/var/log/jenkins/jenkins.log  --webroot=/var/cache/jenkins/war"
We can see that the FROM clause points to jenkins/jenkins:2.112. In Dockerfile terms, that means the image named jenkins/jenkins tagged with 2.112, which happens to be the Jenkins version. Let’s go hunt that down on Dockerhub.
1. Go to: http://hub.docker.com.
2. Dockerhub is super useful for sharing images publicly, and if you want you can register an account—but this tutorial doesn’t require it.
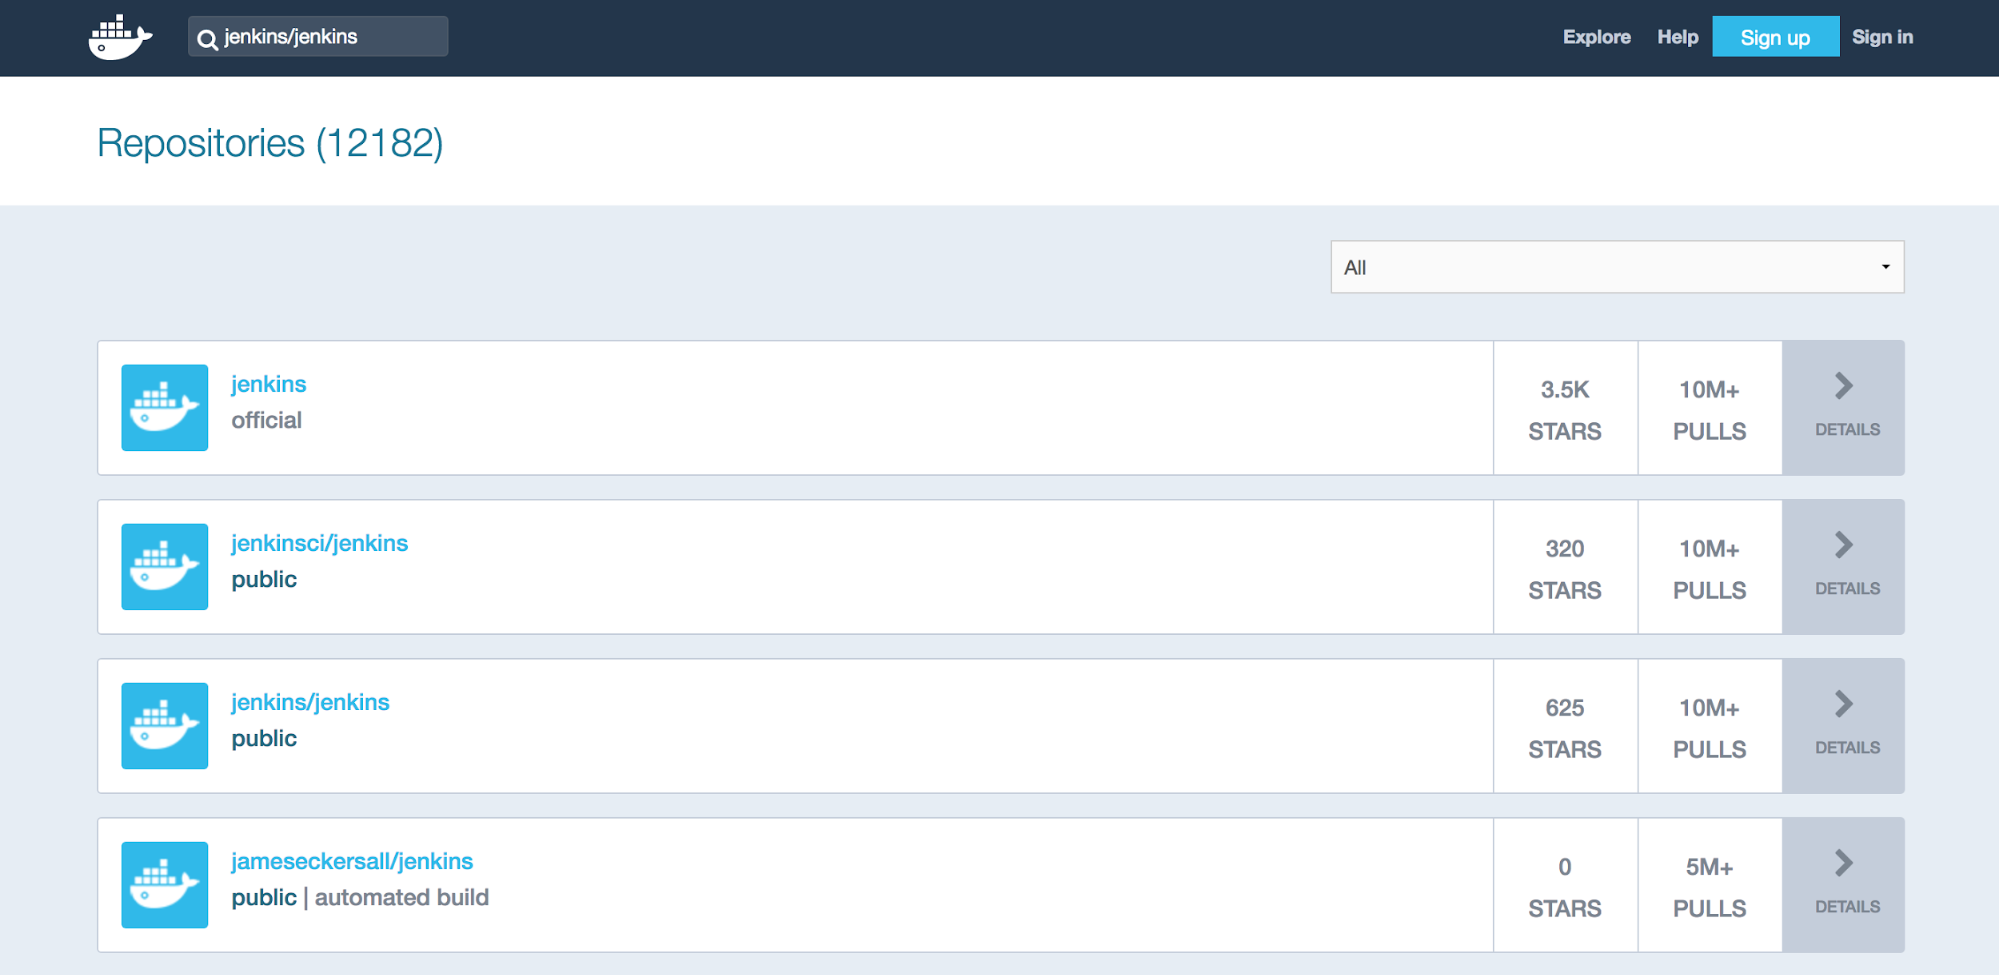
3. In the search window enter the image name, in this case: jenkins/jenkins.
4. A list of image repositories comes back. Click on jenkins/jenkins near the top. Careful not to confuse the jenkinsci/jenkins image!
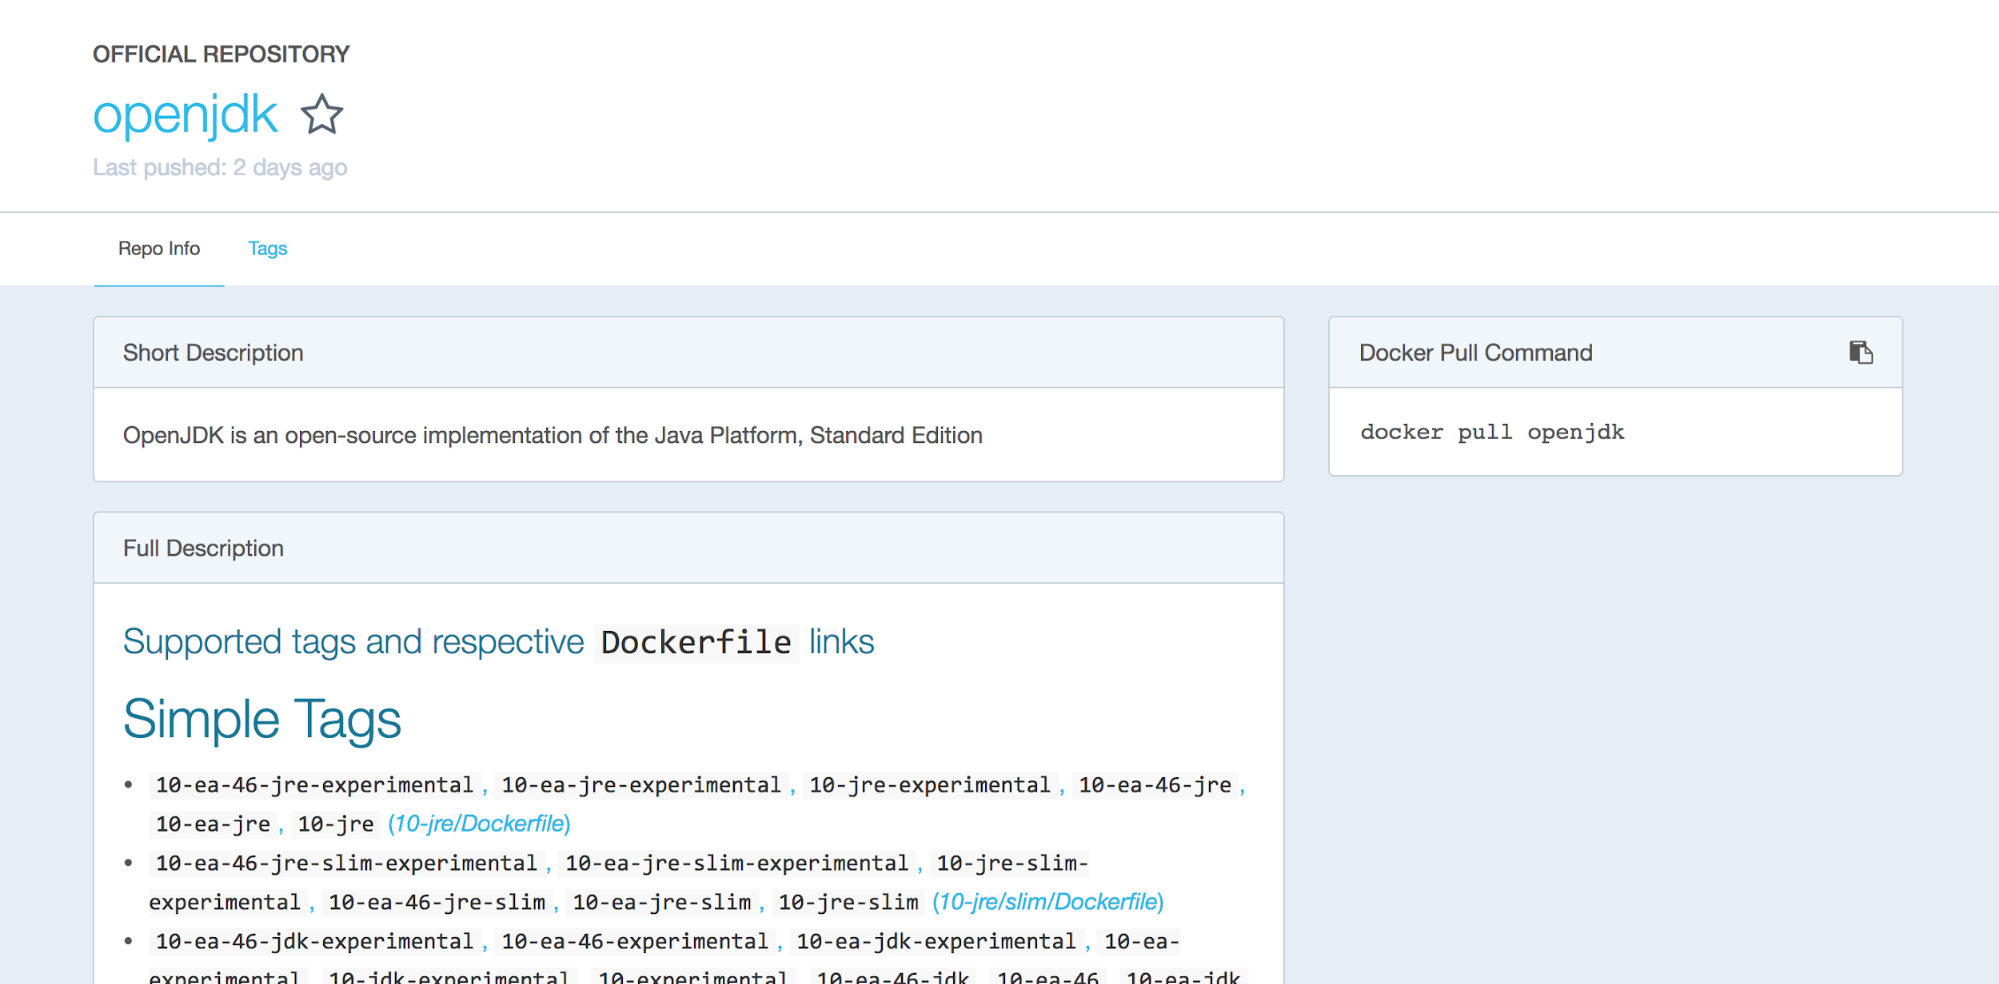
5. You should now see a description of the image. Notice the tags tab. All images on Dockerhub contain this section.
6. Click on the tags tab to get a list of all known tags for this image. You’ll see there are a lot of variants. Go ahead and click back on the Repo Info tag.
7. What we’re looking for is the Dockerfile use to build these images. Usually the repo info tab has a link to a github or other public resource where the “Source” of the image comes from. In the case of Jenkins there’s a documentation link in the description. 
8. Following the link takes you straight to a Github page with the Dockerfile details, which is what we’re after. For brevity that repo is currently at this link: https://github.com/jenkinsci/docker. You can find the Dockerfile at the top level.
Our goal is to replicate this Dockerfile but own the dependencies, so save the text of this file. We’ll put together our new Dockerfile towards the end of this tutorial after we’ve got a full list of all of the dependencies. For the record, the current Jenkins Dockerfile is:
FROM openjdk:8-jdk

RUN apt-get update && apt-get install -y git curl && rm -rf /var/lib/apt/lists/*

ARG user=jenkins
ARG group=jenkins
ARG uid=1000
ARG gid=1000
ARG http_port=8080
ARG agent_port=50000

ENV JENKINS_HOME /var/jenkins_home
ENV JENKINS_SLAVE_AGENT_PORT ${agent_port}

# Jenkins is run with user `jenkins`, uid = 1000
# If you bind mount a volume from the host or a data container,
# ensure you use the same uid
RUN groupadd -g ${gid} ${group} \
   && useradd -d "$JENKINS_HOME" -u ${uid} -g ${gid} -m -s /bin/bash ${user}

# Jenkins home directory is a volume, so configuration and build history
# can be persisted and survive image upgrades
VOLUME /var/jenkins_home

# `/usr/share/jenkins/ref/` contains all reference configuration we want
# to set on a fresh new installation. Use it to bundle additional plugins
# or config file with your custom jenkins Docker image.
RUN mkdir -p /usr/share/jenkins/ref/init.groovy.d

# Use tini as subreaper in Docker container to adopt zombie processes
ARG TINI_VERSION=v0.16.1
COPY tini_pub.gpg /var/jenkins_home/tini_pub.gpg
RUN curl -fsSL https://github.com/krallin/tini/releases/download/${TINI_VERSION}/tini-static-$(dpkg --print-architecture) -o /sbin/tini \
 && curl -fsSL https://github.com/krallin/tini/releases/download/${TINI_VERSION}/tini-static-$(dpkg --print-architecture).asc -o /sbin/tini.asc \
 && gpg --import /var/jenkins_home/tini_pub.gpg \
 && gpg --verify /sbin/tini.asc \
 && rm -rf /sbin/tini.asc /root/.gnupg \
 && chmod +x /sbin/tini

COPY init.groovy /usr/share/jenkins/ref/init.groovy.d/tcp-slave-agent-port.groovy

# jenkins version being bundled in this docker image
ARG JENKINS_VERSION
ENV JENKINS_VERSION ${JENKINS_VERSION:-2.60.3}

# jenkins.war checksum, download will be validated using it
ARG JENKINS_SHA=2d71b8f87c8417f9303a73d52901a59678ee6c0eefcf7325efed6035ff39372a

# Can be used to customize where jenkins.war get downloaded from
ARG JENKINS_URL=https://repo.jenkins-ci.org/public/org/jenkins-ci/main/jenkins-war/${JENKINS_VERSION}/jenkins-war-${JENKINS_VERSION}.war

# could use ADD but this one does not check Last-Modified header neither does it allow to control checksum
# see https://github.com/docker/docker/issues/8331
RUN curl -fsSL ${JENKINS_URL} -o /usr/share/jenkins/jenkins.war \
 && echo "${JENKINS_SHA}  /usr/share/jenkins/jenkins.war" | sha256sum -c -

ENV JENKINS_UC https://updates.jenkins.io
ENV JENKINS_UC_EXPERIMENTAL=https://updates.jenkins.io/experimental
RUN chown -R ${user} "$JENKINS_HOME" /usr/share/jenkins/ref

# for main web interface:
EXPOSE ${http_port}

# will be used by attached slave agents:
EXPOSE ${agent_port}

ENV COPY_REFERENCE_FILE_LOG $JENKINS_HOME/copy_reference_file.log

USER ${user}

COPY jenkins-support /usr/local/bin/jenkins-support
COPY jenkins.sh /usr/local/bin/jenkins.sh
COPY tini-shim.sh /bin/tini
ENTRYPOINT ["/sbin/tini", "--", "/usr/local/bin/jenkins.sh"]

# from a derived Dockerfile, can use `RUN plugins.sh active.txt` to setup /usr/share/jenkins/ref/plugins from a support bundle
COPY plugins.sh /usr/local/bin/plugins.sh
COPY install-plugins.sh /usr/local/bin/install-plugins.sh
The most important thing to note is that Jenkins uses FROM openjdk:8-jdk which will be the next Dockerfile we need to hunt down.
Before we do that, however, we should understand everything in this file as we’ll want to replicate it in our own Dockerfile. There’s a lot in here: Cloudbees has put a good amount of work into making a solid Docker image. The highlights to pay attention to are as follows:
1. Environment variables are set up for JENKINS_HOME, JENKINS_SLAVE_PORT, JENKINS_UC, and JENKINS_VERSION.
2. Dockerfile ARG (build time arguments) are set up for:
-
user
-
group
-
uid
-
gid
-
http_port
-
agent_port
-
TINI_VERSION
-
JENKINS_VERSION
-
JENKINS_SHA
-
JENKINS_URL
3. The image uses Tini to help manage any zombie processes, which is an interesting addition. We’ll be keeping this as sub-process reaping for Jenkins is necessary.
4. The Jenkins war file is pulled into the image by the Dockerfile with a curl request.
5. The file itself installs curl, and git using apt-get, which lets us know the OS is some Debian/Ubuntu flavor of Linux.
6. Three files are copied into the container from source: jenkins.sh, plugins.sh, and init.groovy. We’ll need versions of these in our own image if we want to share this behavior.
7. A couple of ports are exposed expressed as variables http_port and agent_port (8080 and 50000 respectively), for Jenkins to listen on and Slaves to talk to Jenkins respectively.
That’s a lot to take in and a lot to maintain. This is a good opportunity to consider how much work managing our own Dockerfile will be.
CONTINUE DOWN THE RABBIT HOLE
With the Jenkins Dockerfile set aside, we need to repeat the process for every FROM clause we find until we get to the base operating system. That means searching Dockerhub again for the next image: in this case, openjdk:8-jdk.
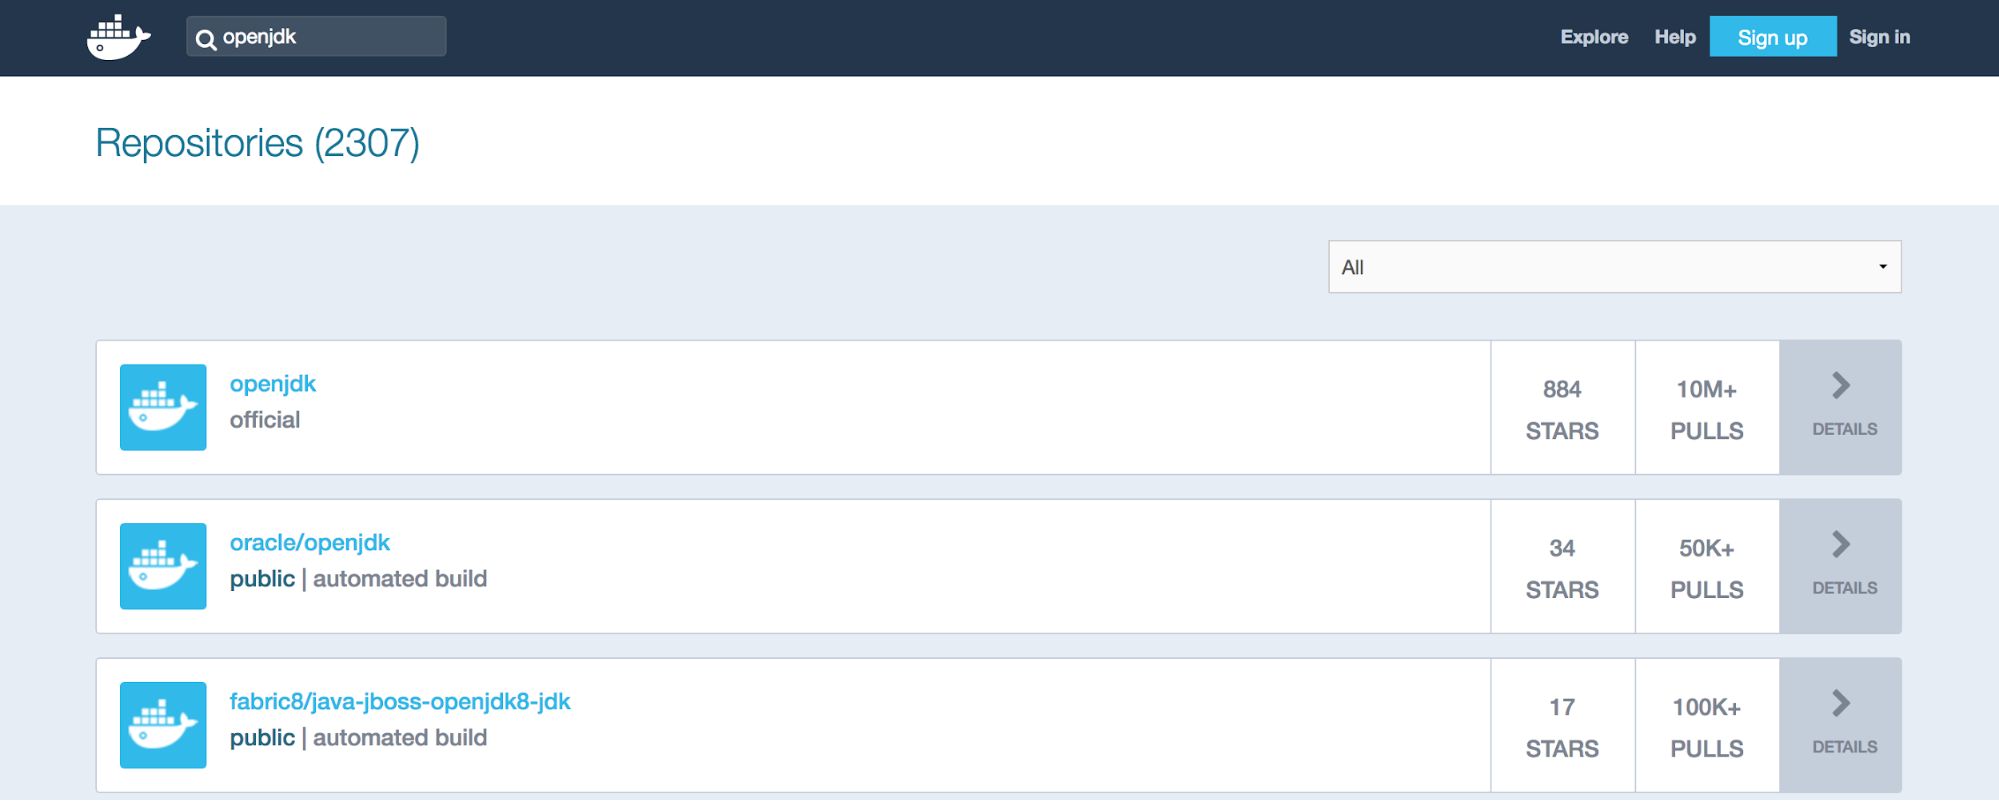
1. Enter openjdk into the Dockerhub search window (make sure you’re at the Dockerhub main page and not just searching the Jenkins repository).
2. openjdk comes back as the first repository. Click on it.
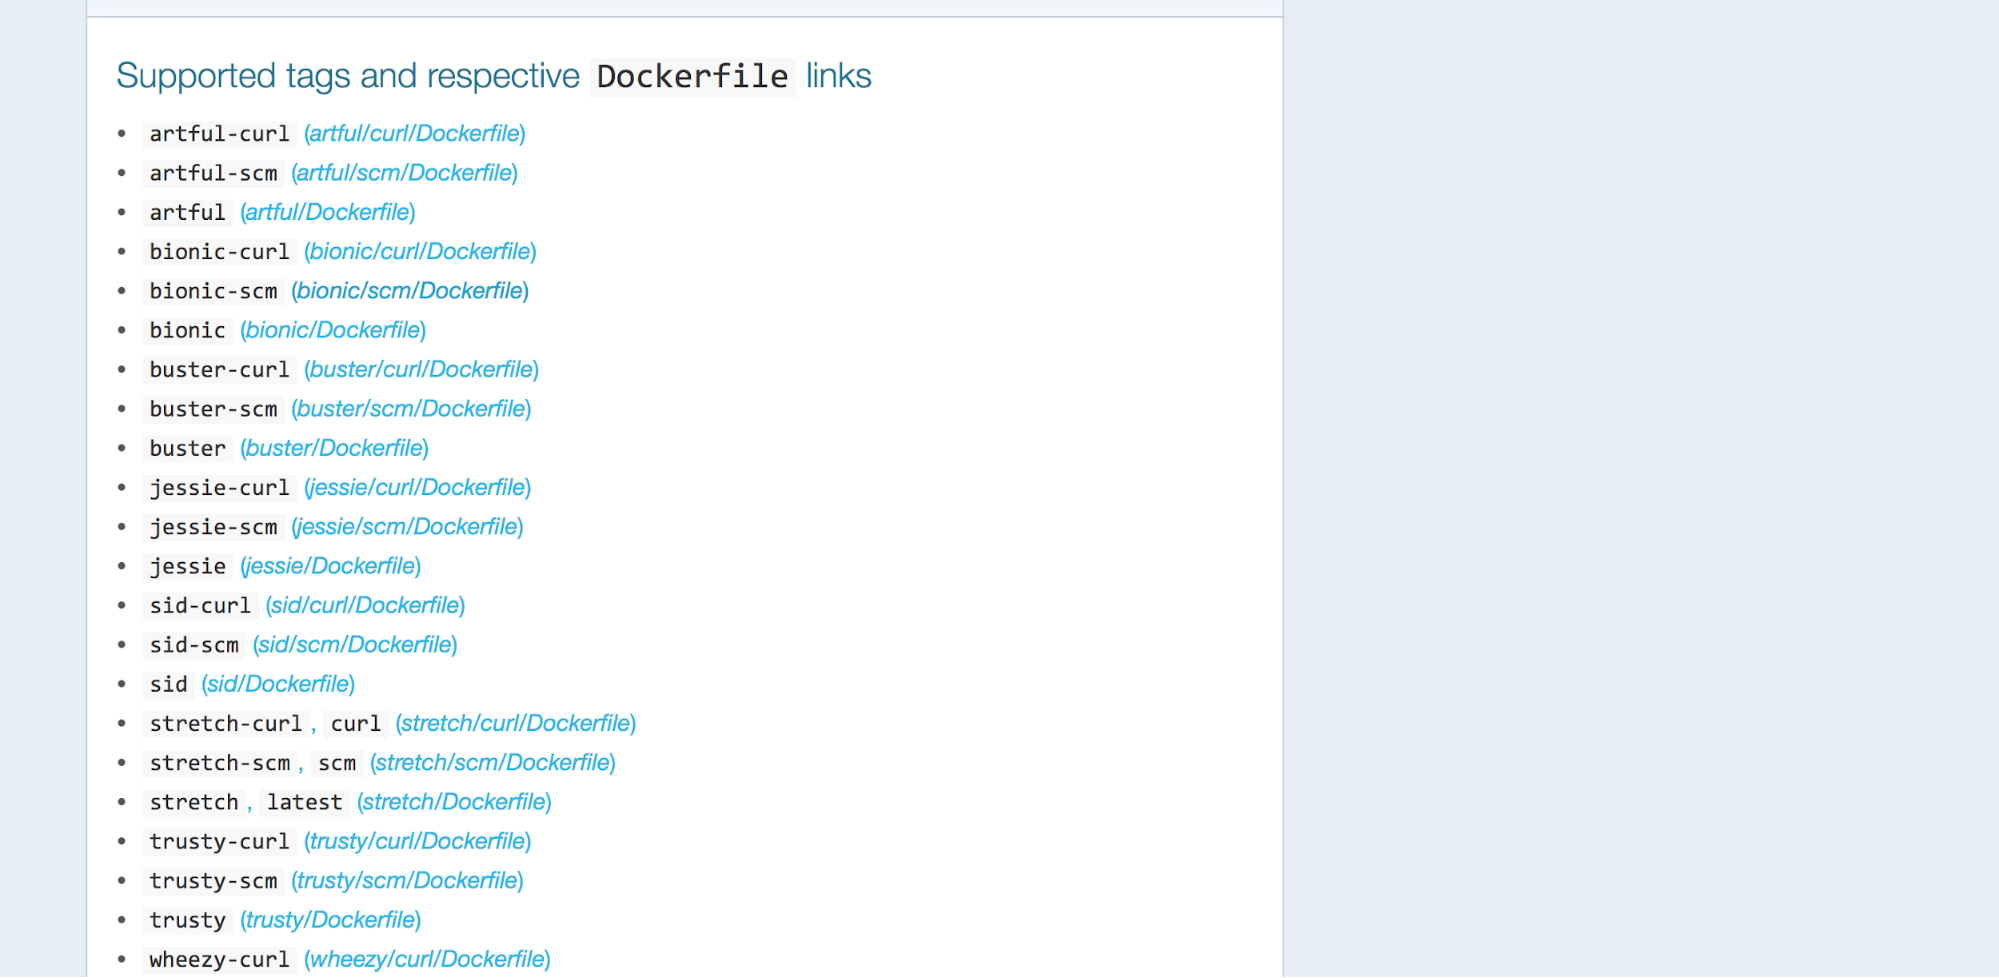
3. Under the Supported tags section we can see Java has a lot of different tags and images. Find the row that mentions the tag we’re after, 8-jdk, and follow the link to its Dockerfile.
 This is an interesting image. It’s the publicly available openjdk 8-jdk image that itself, in its FROM clause, references yet another public image, buildpack-deps:stretch-scm. So we’re going to have to hunt down another image, but we’re not done finding out what’s in the image we have.
This image does a few things we need to pay attention to:
1. Installs bzip, unzip and xz-utils.
2. Uses apt-get to install opendjdk-8 and ca-certificates via a set of complex scripts
For the record here’s the entire Dockerfile:
#
# NOTE: THIS DOCKERFILE IS GENERATED VIA "update.sh"
#
# PLEASE DO NOT EDIT IT DIRECTLY.
#

FROM buildpack-deps:stretch-scm

# A few reasons for installing distribution-provided OpenJDK:
#
#  1. Oracle.  Licensing prevents us from redistributing the official JDK.
#
#  2. Compiling OpenJDK also requires the JDK to be installed, and it gets
#     really hairy.
#
#     For some sample build times, see Debian's buildd logs:
#       https://buildd.debian.org/status/logs.php?pkg=openjdk-8

RUN apt-get update && apt-get install -y --no-install-recommends \
        bzip2 \
        unzip \
        xz-utils \
    && rm -rf /var/lib/apt/lists/*

# Default to UTF-8 file.encoding
ENV LANG C.UTF-8

# add a simple script that can auto-detect the appropriate JAVA_HOME value
# based on whether the JDK or only the JRE is installed
RUN { \
        echo '#!/bin/sh'; \
        echo 'set -e'; \
        echo; \
        echo 'dirname "$(dirname "$(readlink -f "$(which javac || which java)")")"'; \
    } > /usr/local/bin/docker-java-home \
    && chmod +x /usr/local/bin/docker-java-home

# do some fancy footwork to create a JAVA_HOME that's cross-architecture-safe
RUN ln -svT "/usr/lib/jvm/java-8-openjdk-$(dpkg --print-architecture)" /docker-java-home
ENV JAVA_HOME /docker-java-home

ENV JAVA_VERSION 8u162
ENV JAVA_DEBIAN_VERSION 8u162-b12-1~deb9u1

# see https://bugs.debian.org/775775
# and https://github.com/docker-library/java/issues/19#issuecomment-70546872
ENV CA_CERTIFICATES_JAVA_VERSION 20170531+nmu1

RUN set -ex; \
    \
# deal with slim variants not having man page directories (which causes "update-alternatives" to fail)
    if [ ! -d /usr/share/man/man1 ]; then \
        mkdir -p /usr/share/man/man1; \
    fi; \
    \
    apt-get update; \
    apt-get install -y \
        openjdk-8-jdk="$JAVA_DEBIAN_VERSION" \
        ca-certificates-java="$CA_CERTIFICATES_JAVA_VERSION" \
    ; \
    rm -rf /var/lib/apt/lists/*; \
    \
# verify that "docker-java-home" returns what we expect
    [ "$(readlink -f "$JAVA_HOME")" = "$(docker-java-home)" ]; \
    \
# update-alternatives so that future installs of other OpenJDK versions don't change /usr/bin/java
    update-alternatives --get-selections | awk -v home="$(readlink -f "$JAVA_HOME")" 'index($3, home) == 1 { $2 = "manual"; print | "update-alternatives --set-selections" }'; \
# ... and verify that it actually worked for one of the alternatives we care about
    update-alternatives --query java | grep -q 'Status: manual'

# see CA_CERTIFICATES_JAVA_VERSION notes above
RUN /var/lib/dpkg/info/ca-certificates-java.postinst configure

# If you're reading this and have any feedback on how this image could be
# improved, please open an issue or a pull request so we can discuss it!
#
#   https://github.com/docker-library/openjdk/issues
We'll need to replicate and/or achieve everything here. It’s important to remember that this Dockerfile is designed to be resilient and used by a large number of public images. We probably don’t need the complexity present in here, but knowing what’s installed is important. For now, let’s go find the next Dockerfile, which is buildpack-deps:stretch-scm. To do that we repeat the process we’ve already followed:
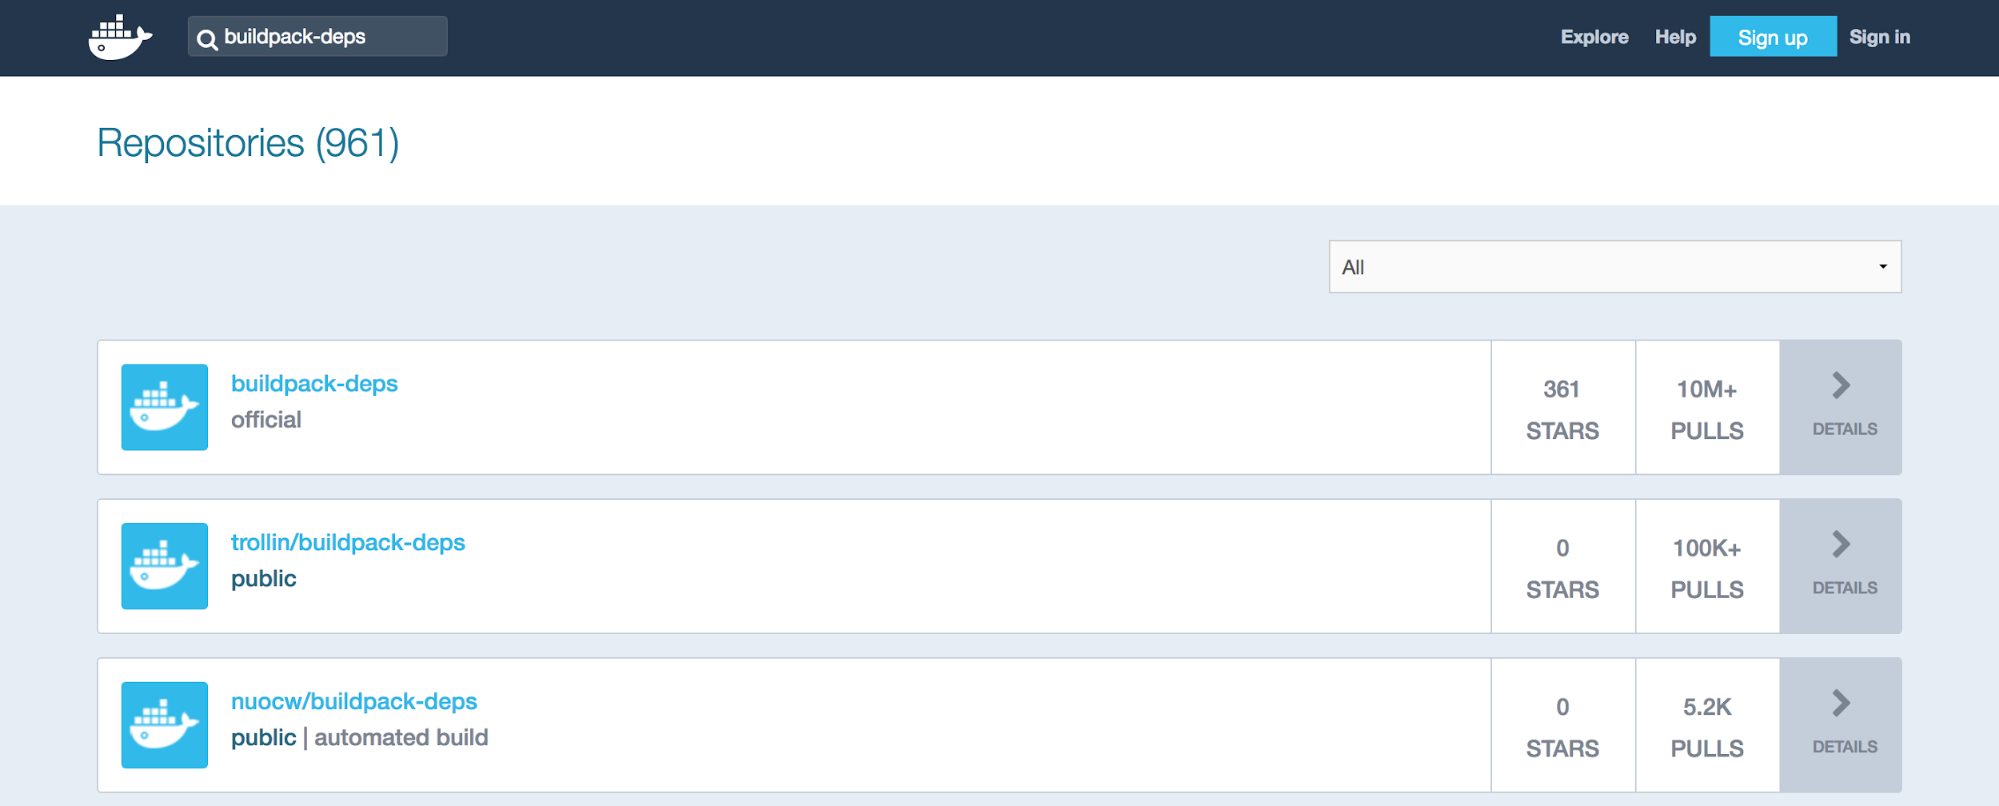
1. Search for buildpack-deps on the main Dockerhub page and select the first result.
 2. stretch-scm is an entry quite a ways down the Supported Tags list. Click the link to find its Dockerfile.
 This Dockerfile is short and sweet. We can see yet another Dockerfile in the dependency chain called buildpack-deps:stretch-curl. But other than that this Dockerfile just installs six things.
1. bzr
2. git
3. mercurial
4. openssh-client
5. subversion
6. procps
This makes sense as it’s billed as an SCM image. This is another opportunity to weigh whether or not you want to replicate this particular behavior. First, the Cloudbees Jenkins image already installs Git. If you don’t need or use bazaar, mercurial, or subversion then you probably don’t need to install them and you can save some space in your image. For completeness, here’s the entire Dockerfile:
FROM buildpack-deps:stretch-curl

# procps is very common in build systems, and is a reasonably small package
RUN apt-get update && apt-get install -y --no-install-recommends \
        bzr \
        git \
        mercurial \
        openssh-client \
        subversion \
        \
        procps \
    && rm -rf /var/lib/apt/lists/*
Let’s move on to the next dependency in the list. Back to the main Dockerhub search page.
1. Search for buildpack-deps and follow the first result.
2. Follow the first link which is stretch--curl.
Looking at this image we’ve finally found the last dependency. This image has a FROM clause to debian:stretch which is the OS. We can see that this image has a simple purpose: to install a few more apps:
1. wget
2. curl
3. ca-certificates
This is interesting because our other images already install all of these items. We really don’t need this image in the dependency tree as it adds no value.
We’ve now completed the dependency crawl for the Jenkins base image. We’ve found some things we need to pay attention to and copy, and we’ve also found some things we just don’t need and can throw away when making our own complete Dockerfile. For the record here’s the complete dependency chain:
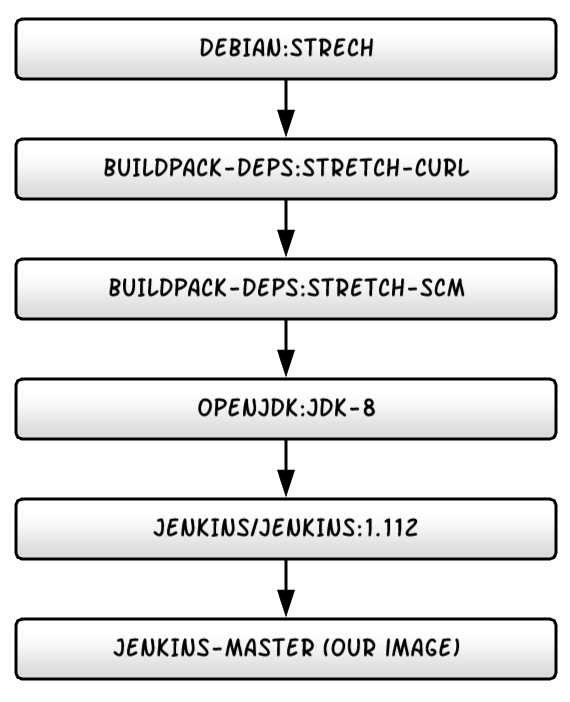
Don’t forget: we wrapped the Jenkins image with our own Dockerfile in the previous tutorials so we need to remember that for the next step, which is making our own Dockerfile.
MAKING OUR OWN DOCKERFILE
With all the research done on the dependencies we can now construct our own Dockerfile. The easiest way would be to just cut and paste everything together and skip the FROM clauses. That would work, but would also create some redundant commands and cruft. We can optimize the size of the image by removing some things we probably don’t need.
We confirmed that the entire image chain is built on top of Debian:Stretch, and for this tutorial I’ll walk through taking control of that setup. At the end, I'll provide a link to an alternative built on top of CentOS7 which I prefer due to a strong familiarity with that OS thanks to all the work we do with it at Riot. Either OS is just fine and the power of Docker is that you can choose whatever you want for your containers.
So let’s begin making a completely updated jenkins-master image. For the record, here’s the Dockerfile for jenkins-master we have so far (if you’ve followed all the tutorials):
FROM jenkins:2.112
LABEL maintainer=”[email protected]”

# Prep Jenkins Directories
USER root
RUN mkdir /var/log/jenkins
RUN mkdir /var/cache/jenkins
RUN chown -R jenkins:jenkins /var/log/jenkins
RUN chown -R jenkins:jenkins /var/cache/jenkins
USER jenkins

# Set Defaults
ENV JAVA_OPTS="-Xmx8192m"
ENV JENKINS_OPTS="--handlerCountMax=300 --logfile=/var/log/jenkins/jenkins.log  --webroot=/var/cache/jenkins/war"
Step one: let’s change the FROM clause to Debian:
1. Open the jenkins-master/Dockerfile in your favorite editor.
2. Replace the from clause with: FROM debian:stretch.
Next step: we should get all of our application installs with apt-get squared away. Let’s make a new section at the top of the Dockerfile after the LABEL but before the USER section and add the following:
FROM debian:stretch
LABEL maintainer="[email protected]"

ENV LANG C.UTF-8
ENV JAVA_VERSION 8u162
ENV JAVA_DEBIAN_VERSION 8u162-b12-1~deb9u1

# see https://bugs.debian.org/775775
# and https://github.com/docker-library/java/issues/19#issuecomment-70546872
ENV CA_CERTIFICATES_JAVA_VERSION 20170531+nmu1

RUN apt-get update \
    && apt-get install -y --no-install-recommends \
    wget \
    curl \
    ca-certificates \
    zip \
    openssh-client \
    unzip \
    openjdk-8-jdk="$JAVA_DEBIAN_VERSION" \
    ca-certificates-java="$CA_CERTIFICATES_JAVA_VERSION" \
    && rm -rf /var/lib/apt/lists/*

RUN /var/lib/dpkg/info/ca-certificates-java.postinst configure
That’s a lot of stuff! You’ll note I consolidated the apt-get installs from all the Dockerfiles we looked at into this one set. To do this I had to set all the necessary environment variables used for Java versions and certificates first. I’d recommend testing that everything installs before continuing to add more stuff to the Dockerfile.
docker build jenkins-master/
We’re just testing that everything installs fine, so this image can be a throwaway. You’ll probably get an error about a missing Jenkins user - that’s okay. Because we changed the base image to the Debian OS, we removed (for now) the Jenkins image which was creating that user.
With the installs out of the way we’ve basically absorbed the Buildpack images and the Java image. So all that’s left is adopting the Jenkins image into our master image.
There’s a lot to go through so I’ll take it a step at a time. First let’s set up all our build arguments and any environment variables we can. We might as well keep the build argument behavior from the Cloudbees image because it can be handy if we want to leverage it. After your apt-get installs and configures certificates add the following lines:
ARG user=jenkins
ARG group=jenkins
ARG uid=1000
ARG gid=1000
ARG http_port=8080
ARG agent_port=50000
ARG JENKINS_VERSION=2.112
ARG TINI_VERSION=v0.17.0

# jenkins.war checksum, download will be validated using it
ARG JENKINS_SHA=085f597edeb0d49d54d7653f3742ba31ed72b8a1a2b053d2eb23fd806c6a5393

# Can be used to customize where jenkins.war get downloaded from
ARG JENKINS_URL=https://repo.jenkins-ci.org/public/org/jenkins-ci/main/jenkins-war/${JENKINS_VERSION}/jenkins-war-${JENKINS_VERSION}.war

ENV JENKINS_VERSION ${JENKINS_VERSION}
ENV JENKINS_HOME /var/jenkins_home
ENV JENKINS_SLAVE_AGENT_PORT ${agent_port}
ENV JENKINS_UC https://updates.jenkins.io
ENV JENKINS_UC_EXPERIMENTAL=https://updates.jenkins.io/experimental
ENV JAVA_OPTS="-Xmx8192m"
ENV JENKINS_OPTS="--handlerCountMax=300 --logfile=/var/log/jenkins/jenkins.log  --webroot=/var/cache/jenkins/war"
ENV COPY_REFERENCE_FILE_LOG $JENKINS_HOME/copy_reference_file.log
This is a pretty huge list of arguments and environment variables. I gathered all these together by reading the Cloudbees Jenkins Dockerfile. I like to have as many of these in one place in my Dockerfiles as possible. Key things you want to pay attention to:
- The jenkins version is controlled by an argument called JENKINS_VERSION and its matching validation SHA is JENKINS_SHA.
- Changing the Jenkins version can be done by editing the Dockerfile and rebuilding, or by passing in a build argument parameter.
- I modified the JENKINS_VERSION argument to have a default (vs the Cloudbees original) and I updated the JENKINS_SHA to match.
- To find available versions and SHA’s for Jenkins WAR files you can go here: http://mirrors.jenkins.io/war/
- You’ll see I include environment variables, like JAVA_OPTS and JENKINS_OPTS from our previous files here.
Next up we should install Tini. Fun fact, Docker has native support for Tini but it requires enabling a command line option: --init. Docker services and thus Docker-compose do NOT have support for it however. There are workarounds, but I suggest installing it as Cloudbees does to be safe. If you want to read more on this, check out this github issue. Please note, I install Tini somewhat differently than Cloudbees does, in part to get the latest version and in part to skip the GPG key validation. You can add back the GPG key validation if you wish. The full install guide for Tini is at Tini’s github here. Go ahead and add the following lines to your Dockerfile just after the ENV options:
# Use tini as subreaper in Docker container to adopt zombie processes
RUN curl -fsSL https://github.com/krallin/tini/releases/download/${TINI_VERSION}/tini-static-$(dpkg --print-architecture) -o /sbin/tini \
 && chmod +x /sbin/tini
You’ll note the version comes from the arguments list I had you add earlier.
Next I placed the three entries we need to get Jenkins installed. That’s creating the Jenkins user itself, creating a volume mount and setting up the init directory.
# Jenkins is run with user `jenkins`, uid = 1000
# If you bind mount a volume from the host or a data container,
# ensure you use the same uid
RUN groupadd -g ${gid} ${group} \
   && useradd -d "$JENKINS_HOME" -u ${uid} -g ${gid} -m -s /bin/bash ${user}

# Jenkins home directory is a volume, so configuration and build history
# can be persisted and survive image upgrades
VOLUME /var/jenkins_home

# `/usr/share/jenkins/ref/` contains all reference configuration we want
# to set on a fresh new installation. Use it to bundle additional plugins
# or config file with your custom jenkins Docker image.
RUN mkdir -p /usr/share/jenkins/ref/init.groovy.d
With these in place we can run the CURL command to grab the right jenkins.war file. Note that this uses the JENKINS_VERSION build argument variable, so if you want to change this in the future, change the default build argument or pass in the version you want to use (and matching SHA) to the --build-arg option in “docker build”.
#Install Jenkins
RUN curl -fsSL ${JENKINS_URL} -o /usr/share/jenkins/jenkins.war \
 && echo "${JENKINS_SHA}  /usr/share/jenkins/jenkins.war" | sha256sum -c -
Next, we set up all the directory and user permissions. These are carried over from the jenkins-master image we created in previous tutorials, and we still want these to help better isolate our Jenkins installation. The one we bring in from the Cloudbees image is the jenkins/ref directory.
# Prep Jenkins Directories
RUN chown -R ${user} "$JENKINS_HOME" /usr/share/jenkins/ref
RUN mkdir /var/log/jenkins
RUN mkdir /var/cache/jenkins
RUN chown -R ${user}:${group} /var/log/jenkins
RUN chown -R ${user}:${group} /var/cache/jenkins
Don’t forget to switch the references to the build arguments for user and group now that we’re taking on that responsibility. Next up we’ll expose the ports we need:
# Expose Ports for web and slave agents
EXPOSE ${http_port}
EXPOSE ${agent_port}
All that’s left is to copy in the utility files that Cloudbees has in their image, set the Jenkins user, and run startup commands. I left the COPY entries until now per some good Dockerfile best practices. These are likely to change outside the Dockerfile and if they do change we wouldn’t want to necessarily invalidate the entire file cache. So here they are:
# Copy in local config files
COPY init.groovy /usr/share/jenkins/ref/init.groovy.d/tcp-slave-agent-port.groovy
COPY jenkins-support /usr/local/bin/jenkins-support
COPY plugins.sh /usr/local/bin/plugins.sh
COPY jenkins.sh /usr/local/bin/jenkins.sh
COPY install-plugins.sh /usr/local/bin/install-plugins.sh
RUN chmod +x /usr/share/jenkins/ref/init.groovy.d/tcp-slave-agent-port.groovy \
   && chmod +x /usr/local/bin/jenkins-support \
   && chmod +x /usr/local/bin/plugins.sh \
   && chmod +x /usr/local/bin/jenkins.sh \
   && chmod +x /usr/local/bin/install-plugins.sh
Note: until we get copies of these files into our repository, they won’t work and our Dockerfile won’t build. We’ll take care of that when we test everything. Pay special attention to the fact that I added the chmod +x commands, because this guarantees the files being added are executable. For now finish up by setting the Jenkins user and entry point.
# Switch to the jenkins user
USER ${user}

# Tini as the entry point to manage zombie processes
ENTRYPOINT ["/sbin/tini", "--", "/usr/local/bin/jenkins.sh"]
You can of course find the entire file in the tutorial on Github. For now let’s test all the changes we just made by building the Dockerfile. Remember that we’re expecting errors when we get to the COPY commands.
docker build jenkins-master/
Everything should work as expected including the errors for the missing shell scripts. So that’s the last thing we need to take care of.
Go to the Cloudbees Jenkins Dockerfile Github repo. We need to get copies of the five files they use:
1. init.groovy
2. install-plugins.sh
3. plugins.sh
4. jenkins.sh
5. jenkins-support
Download or make copies of these files and put them in the jenkins-master folder right next to the Dockerfile. You technically don’t have to keep these, but before you decide not to use them here’s a quick rundown of what they do:
1. init.groovy - This file is run when Jenkins starts, and as a groovy file it runs with context inside the Java WAR that is Jenkins. In this case it’s taking the environment variable set for the Slave agents (50000) and making sure that is the port Jenkins uses. You can do a lot more with this groovy file to guarantee Jenkins starts with the same configuration settings, even on a fresh installation.
2. Install-plugins.sh - This is a handy file that can be run to auto-download a list of plugins from a plugins text file. Including a list of plugins to install is something you’ll have to do yourself but in a future blog post I’ll use this to make sure things like the necessary Docker plugins are always installed.
3. plugins.sh - This is a legacy version of install-plugins.sh and is deprecated. Cloudbees seems to include this as a favor to legacy users. You can probably not install this and be fine.
4. jenkins.sh - This is a shell script that starts Jenkins using the JAVA_OPTS and JENKINS_OPTS environment variables we set. You should probably keep this one.
5. jenkins-support - A utility script that gathers support data for cloudbees.
All said, Cloudbees provides a useful set of functional scripts so I recommend you keep them. A downside to having our own Dockerfile like this is that if Cloudbees chooses to update these in the future, you won’t get automatic updates. It will pay to keep apprised of any changes Cloudbees makes in case you want to take advantage of them.
With these files in place, our updated Dockerfile for the jenkins-master image is ready. If you’ve followed the tutorial series this far you should have a makefile and docker-compose installed. The next step is to do a final image build and start our new Jenkins application. Run the following commands
docker-compose -p jenkins down -v
docker-compose -p jenkins build
docker-compose -p jenkins up -dThen point your browser to: http://localhost and Jenkins should start.

From this point forward you now have full control of your Docker image down to the OS choice, which of course is still a public OS image. Building your own OS Docker image from scratch is a bit out of scope for this effort.
If you’re curious, my CentOS7-flavored image that does the same thing is available in the tutorial GitHub repo. Feel free to use it or this default Debian one. The big changes are that CentOS uses yum repositories instead of apt-get ones, so a lot of the early installation stuff is changed.
CONCLUSION
Taking control of your Docker images isn’t that hard. At a minimum, paying attention to your dependencies and where they come from can help you understand what goes into making your containers work. Additionally, if you do so, you can find some opportunities to make your image lighter weight and save some disk space by removing things you don’t need to install. You also lower your risk of a dependency breaking on you.
On the other hand, you take on significant responsibility - you won’t get automatic updates and you’ll have to follow along with changes to things like the Cloudbees Jenkins image. Whether or not this is a benefit to you depends on your personal development policies.
Regardless of whether you choose to own your image, I do recommend that you follow the same basic practices here whenever you pick up a new Dockerfile. Find the Docker image it inherits from by using Dockerhub to help you follow the inheritance chain. Be aware of all the Dockerfiles in the chain and what they use. You should always be aware of what your images contain - after all this is stuff running on your network, on your servers. At a minimum it helps you find the base operating system but you can also learn a lot about the ecosystem of Docker images out there and learn some interesting practices, like how Cloudbees uses Tini to manage child processes.
As always, you can find everything we did here on GitHub. There’s been a lot of great dialog on these posts and I’d love it if you leave comments, questions, and observations in the comment thread below!
At this point you should have a fully functional Jenkins master server image set and the basics of your own Jenkins environment. The next series of posts will explore connecting slaves to this server (or any Jenkins server); in particular, we’ll look at container-based build slaves. There are several ways this can currently be done and I will attempt to cover several of the approaches we’ve experimented with at Riot as well as some rather potent lessons learned!
For more information, check out the rest of this series:
Part I: Thinking Inside the Container
Part II: Putting Jenkins in a Docker Container
Part III: Docker & Jenkins: Data That Persists
Part IV: Jenkins, Docker, Proxies, and Compose
Part V: Taking Control of Your Docker Image (this article)
Part VI: Building with Jenkins Inside an Ephemeral Docker Container
Part VII: Tutorial: Building with Jenkins Inside an Ephemeral Docker Container
Part VIII: DockerCon Talk and the Story So Far