Animation in the League of Legends Client
The League of Legends client UI resembles many traditional web applications, both in its choice of technology (JavaScript/HTML) and its range of functionality. However, the League client (the pre-game experience) is not a traditional web app - at its core it’s a game UI with high-quality visuals, which led to several interesting challenges along the way. I’m Richard Ye, a software engineer on the League of Legends client, and I’m going to talk about one of the major development challenges we encountered in the client UI: animation.
The web was not initially designed with animations in mind; those came later with new APIs like CSS animations and Element.animate. There are also libraries like GSAP and Lottie, lower-level APIs like Canvas and WebGL, and even less traditional techniques like videos when appropriate. None of these tools can be used in all cases - they all have advantages and drawbacks. In this article, I’ll discuss the animation tools we use, our experiences with each of them, and which use cases each handle best.
Native animations and the browser rendering pipeline
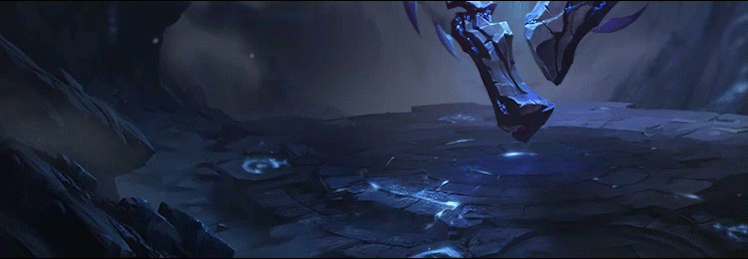
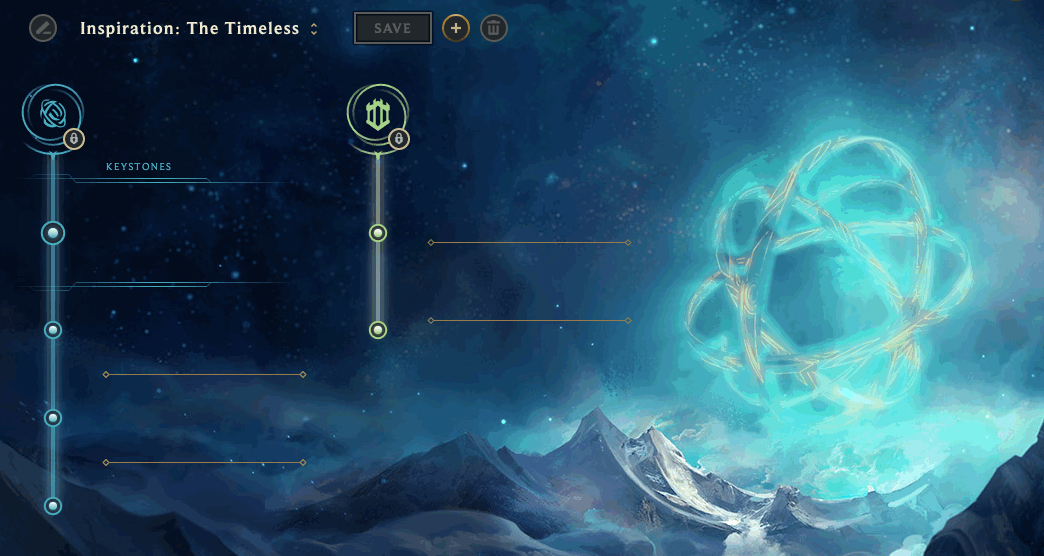
Most web developers have used or at least heard of CSS animations or transitions, which are straightforward ways to tween between two or more keyframes. These are used extensively throughout the client, for both simple cases, like a single element fading in or out, and much more complex situations, like the animation used at the end of the ban phase in champion select:
We quickly ran into limitations using CSS animations. The first issue was render performance. To understand this, let’s dive into how browsers actually turn a tree of DOM elements into pixels on the screen.
After JavaScript is run and styles are computed, web browsers render a frame in three steps: layout, which determines the positions of elements in the flow of a page; paint, which computes the individual pixels for each element; and composite, which puts the pixels from each element together to form the final page. Running one step will also cause the later steps to run, so the smoothest animations consist of only the composite step running each frame. Let’s look into each step in a bit more detail.
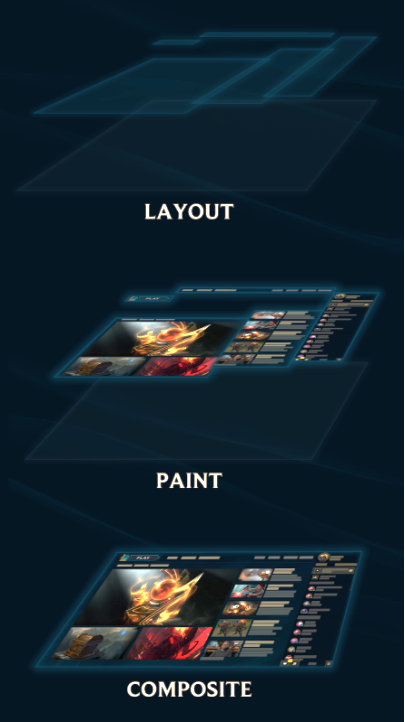 In the layout step, the browser computes the position and scaling of each element on the screen. This is actually a fairly complicated task because an element’s position is often dependent on the positions of every element that came before it on the page, and its dimensions are dependent on the dimensions of all its child elements. Because all of these calculations are CPU-bound, even changing a single element’s dimensions or positions can get very expensive, so you should avoid invalidating the layout of an element during an animation. Luckily, this is the easiest step to avoid, as there’s a much faster way to change the position and dimensions of an element in the composite step.
In the paint step, the browser figures out the color values of individual pixels on each element. This could involve computing things like rendered text, borders, drop shadows, masks, etc. The CPU used to handle this step, but luckily, the GPU now handles more and more of these draw calls. However, due to various inconsistencies between browser vendors, versions, operating systems, and hardware, what is painted quickly on the GPU in one browser may take much longer on another browser or even in the same browser on different machines. For instance, Chrome disables GPU acceleration on certain platforms, like Windows XP and some blacklisted GPUs, and users on most browsers can change a setting to disable it completely. And even if paints are GPU-accelerated, they still aren’t free, so it’s better to avoid animations that cause the paint step to run every frame, and failing that, to test for performance as often as possible.
To save resources, most elements aren’t rendered by themselves, but as part of a rendering layer. This means that invalidating a single element in a layer will cause all elements in that layer to repaint. If you’re planning on painting a layer frequently, setting some CSS properties (like transform) will cause the browser to put it on its own rendering layer for better performance. Don’t do this excessively, however, because each paint layer takes up memory.
The final step, composite, takes all of the painted rendering layers and puts them together on the screen. Before this final step, we can do some really cheap operations on those layers: we can change their opacity, and we can run any matrix transformation (using the transform CSS property). These are trivial tasks for the GPU, and this is why animations that only recompute the composite step are much faster than those requiring a layout or paint step.
Note
It may be helpful for some readers to think of these steps in computer graphics terminology. The layout step is equivalent to calculating the bounding boxes (dimensions) and world-space coordinates (position) of every model (element) in a scene - though in our case all models are just 2D rectangles. The paint step is roughly equivalent to generating and painting the textures for each model and combining them into rendering layers. And the final step, composite, takes all of the textured rendering layers and maps them onto screen space.
These are the basics steps of the browser rendering pipeline. For more information, I suggest reading over Google’s own series of articles on rendering performance, which go over this topic and others in more detail.
Note
New versions of Firefox have a rendering pipeline that is a bit different, though the advice to only animate properties that require a recomposite still applies.
Given this knowledge of the rendering pipeline, animations should only require a recomposite if at all possible. In Chromium (the League client's web engine), this means that we should try to only animate the opacity and transform properties.
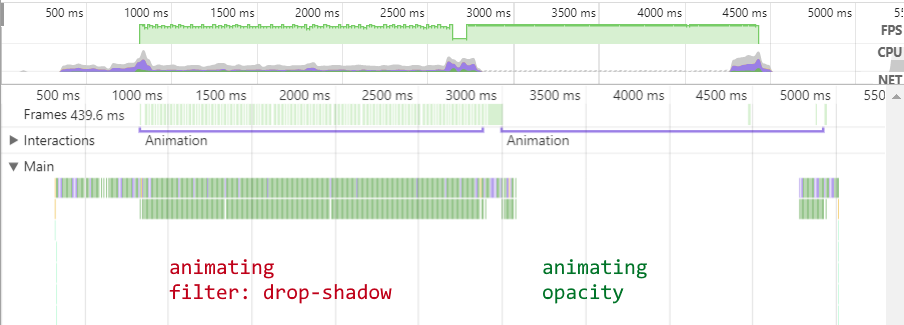
We can do a lot with just those two properties. For instance, if we wanted to animate a shadow fade on text, instead of animating text-shadow or filter (which would result in more expensive repaints), we would duplicate the original element, apply the full text shadow to it, and fade it in and out. The resultant profile shows no CPU overhead with animating opacity, unlike animating filter:
I’ve made some examples in JSFiddle for your experimentation. Keep in mind that due to your browser or system configuration, your results may differ.
In the end we can only go so far - we’re essentially limited to manipulating what’s already drawn on screen. If we wanted to draw something new every frame - such as line drawings or rendering things that can’t be represented by mere HTML and CSS - CSS animations just don’t cut it.
Another severe limitation to CSS animations is the inability to easily tie multiple animations over multiple elements together. For the ban showcase animation, we needed to specify dozens of animation delays in our CSS or bind and unbind animation events in JavaScript. Since there’s no unified timeline on the web, triggering the right animations at the right time often required us to build some sort of state machine or create multiple bindings across a bunch of different components. Ultimately, using pure CSS animations became unwieldy as soon as multiple animations of elements got involved.
We also ran into workflow challenges with our graphics artists. Artists weren’t able to work directly in the implementation of CSS animations due to the tight coupling with the rest of our codebase. It was also difficult to iterate on animations in CSS alone. As a workaround, artists would render the animations as videos (usually in Adobe After Effects) and hand them off to an engineer, who would attempt to implement the same thing in code. Since the limitations weren’t initially apparent to the artist, the engineers often had to compromise performance or visual fidelity. This led to duplicated work and unnecessary dependencies.
JavaScript animations (using Element.animate) are mostly equivalent to CSS animations: they rely on the browser’s internal calculations to interpolate CSS properties between pre-defined keyframes. Using JavaScript you can generate these keyframes and apply animations to elements dynamically instead of hardcoding them. You can also accomplish the chaining of animations with timeouts and event listeners. However, this quickly gets difficult to manage in vanilla JS for animations that have a complex timeline spanning multiple elements, and I would recommend that you only use this for simple cases. I’ll go over some libraries for accomplishing this much more easily later on in this article.
Key points:
-
CSS and JavaScript animations use the browser for tweening CSS properties between keyframes.
-
Understand the browser rendering pipeline: layout, paint, and composite.
-
Animating CSS properties that require a layout recomputation or repaints are generally quite expensive.
-
Things like chaining animations and animating multiple elements need to be handled manually; use an animation library like Greensock for animations spanning multiple elements and/or keyframes.
Videos: faster than browser repaints?
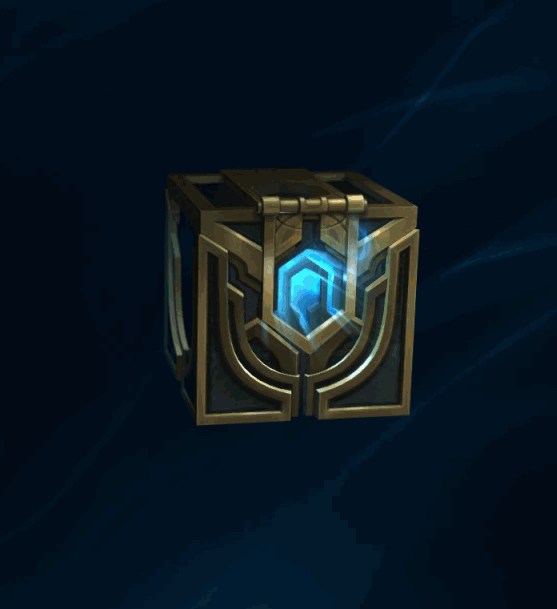
Many websites use videos to create a more dynamic and engaging experience. The League client does this with embedded videos for the release of new content, esports events, etc. We also use them in background animations in some parts of the client, such as the loot screen. These use cases are straightforward and well-known across the industry. In addition to this, however, we used videos for UI elements themselves:

When evaluating techniques, we concluded that videos would be slow to load and render but our experiences have shown them to be viable for small UI elements, even on lower-spec machines. The reasons are inherent in the way browsers render videos. First, the browser has to load the video file itself. The short videos we use in our UI are often 100 kilobytes or less - small enough to be preloaded. Then the browser needs to decode the video into individual pixels for each frame. Hardware acceleration exists for the VP9 video codec (which we use in the client), but only exists on fairly recent browsers. Hardware acceleration is more common for the H.264 codec, but it doesn’t support the alpha channel needed for many visual effects and may have licensing requirements. Thankfully, software decoding is fast enough for our purposes.
Let’s think about how videos fit into the browser rendering pipeline explained earlier. Rendering a frame of a video is done in the paint step: the browser needs to decode the frame of video and provide it to the GPU as a texture for that rendering layer. The paint step is usually considered slow because the browser can’t effectively compute the color values for each pixel quickly enough. We’d see this if we were trying to render relatively expensive effects like glows, smoke, or cloth. But so long as we’re confident that a browser can render a video at a smooth frame rate, we can feel comfortable that the paint step will complete in an acceptable amount of time.
The key advantage when using videos for UI elements is that artists can directly generate video files themselves in a familiar program like Adobe After Effects without worrying about how well they’ll be rendered in real-time in the browser. However, videos only work with things that are purely pre-rendered, meaning that they alone can’t accomplish all UI animations. In our example above, the “Play” text is rendered by the browser in the user’s chosen language, while the rest of the button consists of multiple videos for the various states. Thus, more complex effects requiring some degree of dynamism can be achieved by layering several smaller, partially transparent videos together, combined with other DOM elements.
As we expected, videos for UI animations become less viable the larger the videos are; our lowest-spec players play on computers that have difficulty rendering full-screen video. Since decode can still occur in software, it’s too much of a burden on the CPU to fill an entire screen’s worth of pixels every frame. If your project’s targeted platforms all have hardware-accelerated decode for your chosen video codec, then large videos can be used much more freely. The League client’s low-spec mode replaces most large videos with static images in order to accomodate our players who don’t have hardware-accelerated video decoding, and whose CPUs cannot effectively decode them in software.
Furthermore, videos have a fixed resolution and will look blurry on high-DPI displays unless we use a separate, high-resolution version of each video. This blurriness is most noticeable on crisp, clear lines and boxes, and less so for effects such as smoke. Long, high-resolution videos have large file sizes, so do keep an eye on the total size of your animations.
Nonetheless, for small UI elements that need complex visual effects not easily rendered by the browser engine itself, pre-rendered videos are a simple and effective way to add this extra bit of flair.
Key points:
-
Pre-rendered videos are viable options when real-time rendering is difficult or expensive, e.g. for things like smoke or other effects that aren’t renderable using native browser APIs.
-
Videos are best for small UI elements like buttons, which can be decoded regardless of the availability of hardware acceleration.
-
Hardware acceleration may be required for smooth playback of large videos: use H.264 over VP8/9 if an alpha channel is not needed (and you meet licensing requirements) because hardware acceleration is more widely available.
-
Consider providing a high-resolution video file for high-dpi displays, but stay aware of file sizes.
The Greensock Animation Platform
The Greensock Animation Platform (GSAP) is a commonly used animation library that handles tweening and timelines for animating CSS properties, but uses the browser renderer. That is, it modifies the CSS of elements being animated, but does not actually do any pixel color calculations on its own. On the surface, this may not seem like a big deal compared to vanilla CSS or JavaScript animations, but GSAP’s APIs provide much-needed features critical for larger animations.
The first is a timeline that lets us reliably chain, schedule, and delay effects. For instance, we can have an element animate 50ms after another element’s animation completes. We could, of course, manually calculate the delays in CSS animations by using the animation-delay property, but this quickly becomes difficult to modify - if we had a chain of several animations, a change in an early animation would have to be manually cascaded to the rest. We can also seek to certain points in our timeline and manipulate all component animations (e.g. speed up or slow down the entire sequence).
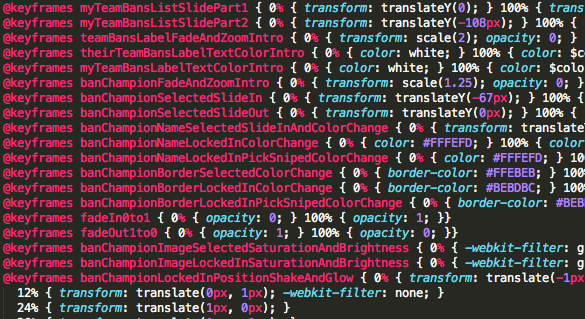
We did use pure CSS animations to accomplish this before adopting GSAP in the 10-ban animation in champion select, and the result is an extremely long CSS file chock full of manually-calculated timings, dozens of @keyframe declarations and hundreds of properties. This was not fun to write and it was difficult to make even small changes. What’s more, defining everything as a massive CSS glob makes it hard to see which elements are actually animating and how the timings are related to each other. Of course, we use a pre-processor with variables and mixins to make things a bit more manageable, but even then, figuring out which out of the dozen timing variables to look for and use is more difficult than using a standard GSAP timeline.
This goes on for a while...
Additionally, while it was basically impossible for motion graphics artists to write CSS animations due the many workarounds and the difficulty of iteration, writing GSAP code is much more feasible. For the Runes Reforged project, the background animatics were developed in JavaScript by an animator who defined the timelines, timings, and effects using GSAP, with engineers doing the final integration work. The key distinction is that the artist could work directly in the browser renderer and work around all its limitations, instead of working in After Effects and wondering whether the effects they created could actually be implemented in the client. Ideally, artists would be able to work in After Effects with confidence that the browser could render the final product, but GSAP alone allowed us to unlock some solid workflow wins.
Greensock also includes a tweener that lets us precisely control an animation more easily than we can with native animations. For instance, we can specify easings that can't be represented by cubic-bezier.
We initially had concerns around the performance of the library - surely performing calculations in JavaScript would be slower than the browser handling them natively, right? Greensock, the company that created GSAP, explained that this wouldn't be a problem. Our testing proved this to be true. The performance profiles of GSAP and Native CSS animations are not substantially different, even on low-end machines. Going back to how browsers actually render frames, this makes sense. The calculation of the style of an element is quick regardless of whether it’s done natively by the browser or via JavaScript - there just isn’t much math involved in interpolating a reasonable number of elements’ property values. Far more work is involved in calculating the colors of individual pixels on the screen, but since GSAP and native animations both use the browser’s renderer, there’s no difference there.
Given the benefit of an improved workflow and additional features, adaptation of GSAP into our workflow was an easy decision to make, and I recommend it for all larger animations where a browser’s HTML/CSS renderer is sufficient. Just remember that the same limitations of that renderer still apply - avoid animating properties that cause layout and paint recalculations, and stick to properties that can be animated using only recomposite calculations.
Key points:
-
GSAP is an excellent library for animating DOM elements, and should be used instead of native animations for all but simple cases.
-
The performance of a GSAP animation is roughly equivalent to the performance of the same native animation.
-
GSAP animations require some JavaScript knowledge to create, and it is ideal if artists have the technical knowledge to do this directly.
-
Since GSAP uses the standard browser rendering pipeline, the same limitations apply: avoid animating properties that cause layout and paint recalculations.
Bypass the pipeline using Canvas and WebGL
The <canvas> tag consists of two modes, a 2D drawing API and WebGL, which can perform both 2D and 3D rendering. Being low-level APIs, both are extremely flexible and quite performant if used correctly. However, we didn’t use either API much in the client.
Initially, the 2D canvas seemed like a good idea because it allows us to draw arbitrary lines, shapes, and images. This would give us the flexibility to render whatever we’d like, but high-quality real-time rendering from these primitives can be extremely expensive. Each time a complex effect had to be added into the client, we would have to choose whether to embed video or spend the engineering resources developing a real-time rendered solution that may not look as nice or render as quickly. Since we knew that videos have high fidelity and are relatively performant, we stuck to using videos.
We typically rendered effects where the 2D canvas implementation seemed simple (like drawing and rotating an image) using HTML or SVG elements instead, and used either native animations or GSAP to animate them as needed. Using the transform property offers fast and reliable 2D and 3D transforms, and it means one fewer set of libraries and workflows to support. The browser rendering pipeline is a powerful GPU-accelerated rendering engine that offers sufficient functionality that we didn’t have to bypass it for our own custom solution.
WebGL is a fully-featured 2D and 3D rendering API based on OpenGL ES, and offers full GPU-accelerated rendering capabilities, allowing full scenes to be rendered in real-time. However, there aren’t too many places that the client could use this capability. Many effects can be done with static textures animated via native animations using the browser renderer. Additionally, our Hextech UI includes a lot of animated smoke and “magic” effects which are difficult to render efficiently in real-time with high quality.
Finally, since hardware acceleration, including WebGL, is disabled in Chromium on Windows XP (which right now League of Legends still supports), we’d have to create an alternative version every time we chose to use WebGL for an animation.
Nonetheless, we’d be remiss not to acknowledge the potential applications of WebGL for rendering interactive experiences, and we’re constantly reevaluating the suite of technologies we work with in the client. As of now, WebGL is just not a good fit for the past and present needs of the League Client UI.
Key points:
-
Canvas/WebGL provide alternatives to the browser’s built in renderer. The 2D canvas provides a low-level drawing API and WebGL offers a full 3D renderer.
-
Real-time effects can be expensive to render at high quality and can be time-consuming to code, so consider pre-rendered videos as an alternative.
Lottie: from After Effects directly to Web
Recently, we’ve been investigating a relatively new library called Lottie by Airbnb, which can display SVG animations in the browser using JSON files exported directly from Adobe After Effects. This offers a major workflow advantage compared to the other techniques - artists can go straight from their preferred program to an output that is immediately renderable in a browser.
Like GSAP, the Lottie library calculates the properties for each element in each frame instead of relying on native animations. The difference is that instead of HTML elements, Lottie operates exclusively on SVG elements, and thus can fully animate things like paths on lines and shapes, as well as raster images.

Airbnb Design
To maintain high performance while using Lottie, it’s important to understand where it fits into the browser rendering pipeline. Similar to GSAP, Lottie computes the properties of all elements on each frame in JavaScript and sets those properties on each element using setAttribute. This was fast for GSAP to compute because GSAP animations generally operate on a relatively low number of elements. With After Effects and Lottie, it’s easy to create animations with dozens, if not hundreds, of SVG elements. Surprisingly, this alone can eat up a significant amount of processing time per frame, especially on lower-end machines.
I did a quick test on a low-end machine and I found that a modern version of Chrome was able to handle around 100,000 setAttribute calls per second. This may sound like a lot, but in order to achieve 60 FPS, each frame must be rendered in 16 milliseconds. Calling setAttribute on 80 elements eats up 5% of the frame budget, and if you’re writing an animation with complex linework or particle effects, it’s easy to hit this number.
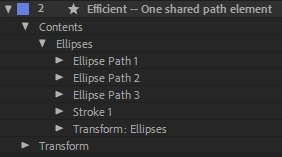
To reduce the number of setAttribute calls per frame without affecting the end result, we can consolidate animations. For instance, instead of transforming each individual shape, we can transform the entire shape layer:

If you’re transforming the stroke for many shapes at the same time, consider moving all of the paths onto the same shape:
After the properties of the SVG elements are computed, the browser needs to render the new frame of the image (the paint step). As of writing, Google Chrome does not seem to preserve any SVG elements between frames - the entire SVG is drawn from scratch. Drawing basic shapes is a pretty easy task, but again, things can add up. Certain shapes are slower to draw than others; generally the slower ones require anti-aliasing, such as with ellipses and curves.
In many animations, only a few parts are animating at the same time. Consider breaking out these separate components into their own SVG animations and using browser layering to combine them all. That way, elements that don’t change from frame to frame don’t need to be redrawn. For example, if your animation has a static background (even if it’s just a solid color), break it out into its own SVG so it doesn’t get redrawn each frame.
Note
As of writing, Google Chrome does not put SVG elements in their own rendering layers automatically, so SVG animations will cause the parent render layer to also repaint each frame. If the parent rendering layer contains a lot of elements, this will impact performance. You should tell the browser to promote your animating SVG elements to their own rendering layer by adding a CSS property like
backface-visibility: hidden;.
We are still actively exploring Lottie at Riot Games. It shows great promise because it would allow artists to work in After Effects and see completed and performant animations in the browser. We hope to keep you updated with any new findings as we continue to work with Lottie.
Key points:
-
Since artists are able to go directly from After Effects to browser-renderable SVG animations, Lottie speeds up the workflow considerably.
-
Lottie is generally performant, but you should still try to limit the number of elements being animated.
-
Each SVG is completely repainted every frame, so avoid putting static elements on the same SVG as animating ones.
Key Takeaways
Based on our experience with these methods of accomplishing animation with a web frontend, we think that native animations are great if you have simple cases like a single element sliding or fading away. But when multiple animations have to be composited together, a library like GSAP provides key features that make creating and editing it a whole lot easier.
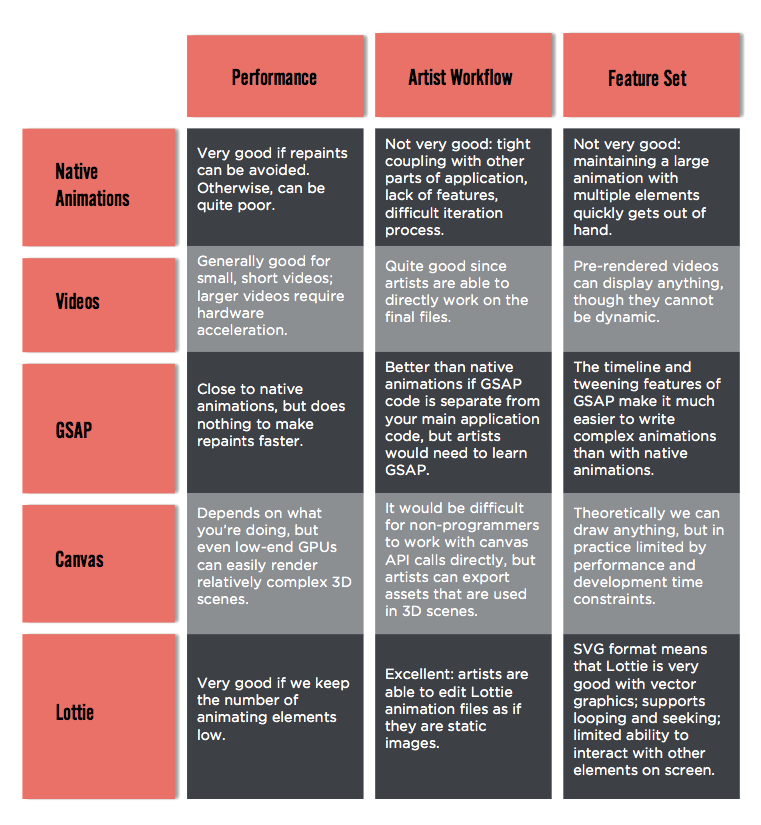
It’s also important to consider workflow when choosing a technique. Complex native animations often result in a jumble of brittle code. Adding a library like GSAP or using pre-rendered videos simplifies the creation and maintenance of this code greatly. The Lottie library also shows promise since it allows artists to work with browser animations without working with code. Here’s a handy comparison of the five techniques we’ve covered:
Since different browsers and system configurations render animations differently, it’s important to test your animations for performance on a variety of different machines. Finally, it’s important not to think of the browser’s renderer as a black box. Like any graphical engine, its abstractions hide key details that affect performance in profound ways which are unintuitive without an understanding of the internals. But behind those abstractions lies a powerful GPU-accelerated rendering pipeline capable of high graphical fidelity and performance if used properly.
High-fidelity animations are relatively new to the web, and I’m glad to have the chance to share some of the things I’ve learned while working with them. I hope you’ve found this post helpful, and please feel free to post any questions or comments below.